What this article says in 30 seconds
- The most common virtual staging mistakes happen before the image is published not after
- Unrealistic scale and property-changing edits create buyer trust and compliance risk
- DesignSense works best when agents start from a strong real room photo and review the output against the actual property
Use DesignSense for this workflow when you need to:
- Real estate agents reviewing AI-staged images before MLS upload
- Listing teams building a quality-control checklist
- Brokerages that want fewer buyer-trust and disclosure issues around virtual staging
The most common virtual staging mistakes are not small style problems. They are the choices that make a staged listing photo look unrealistic, misrepresent the property, or create extra review work before MLS upload.
AI virtual staging can help buyers understand a vacant or dated room faster, but only when the image stays believable. A staged room should clarify the listing. It should not make the home look larger, newer, cleaner, or structurally different than it really is.
If you are still preparing the source images, start with how to prepare listing photos for AI virtual staging first.
The short answer
The biggest virtual staging mistakes are:
- Using a weak source photo
- Staging too many rooms
- Changing permanent property features
- Choosing furniture that does not match the room scale
- Making the style feel wrong for the listing price point
- Ignoring disclosure and original-photo requirements
- Publishing AI output without a human quality review
The fix is not complicated. Start from a real room photo, keep the staging realistic, preserve the original image, and review the final result like a buyer will compare it to the property in person.
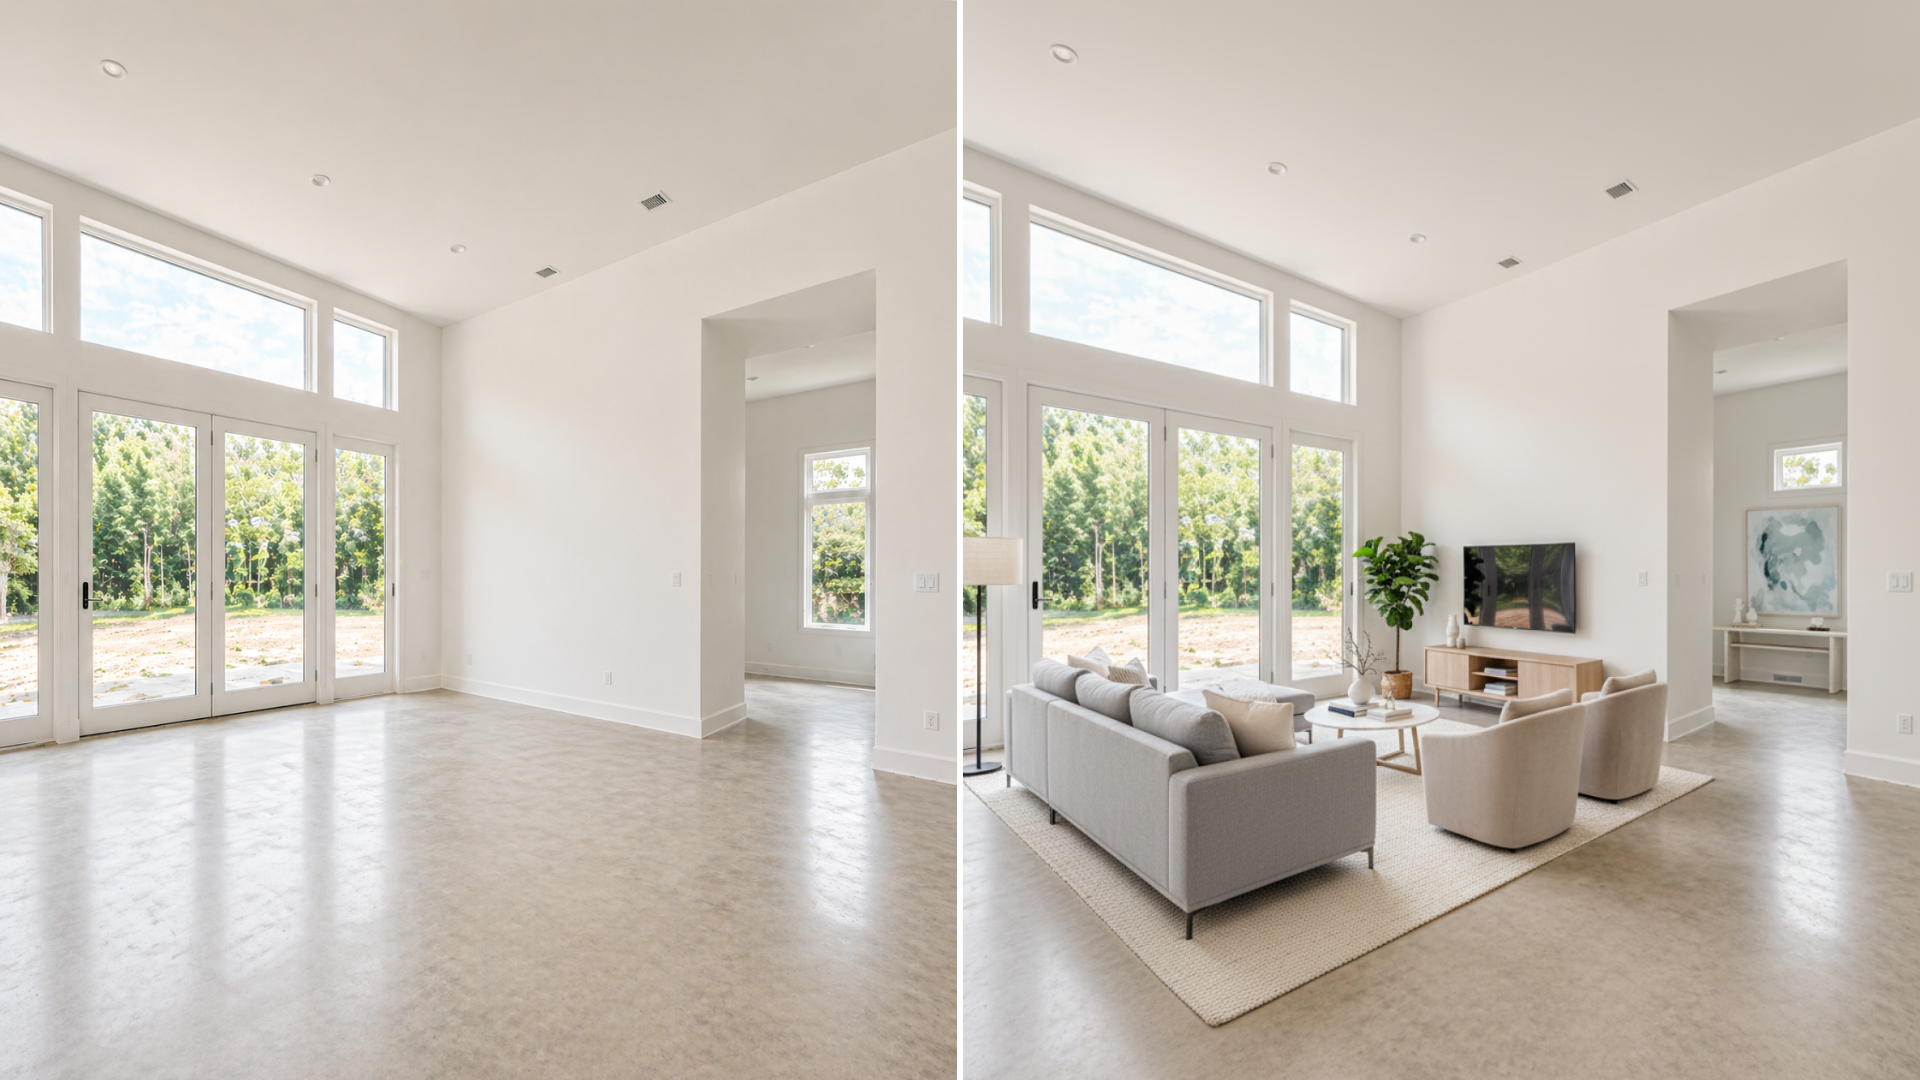
Mistake 1: starting with a bad source photo
Virtual staging is only as strong as the photo it starts from. A weak source photo usually has one or more of these problems:
- The room is too dark
- The camera is tilted
- The floor is mostly hidden
- Furniture blocks the wall line
- The photo is too compressed
- The image shows a doorway sliver instead of the room
- The angle makes the space look stretched or distorted
AI can add furniture and decor, but it still needs the room geometry. If the original image does not show the floor, walls, windows, doors, and layout clearly, the staged output is harder to trust.
Before opening DesignSense, choose the cleanest source photo. If the best photo is slightly soft after staging, use the AI upscaler after the final staging direction is selected.
Mistake 2: staging every room
More staged images do not automatically make a listing stronger. For most listings, the better move is to stage the rooms that shape buyer understanding:
- Main living room
- Primary bedroom
- Dining or open-plan area
- Flex room with an unclear purpose
- One vacant or dated room that weakens the gallery
When every room is staged, buyers may start comparing the digital presentation against the actual showing experience too closely. It also creates more images to review, label, sequence, and defend if a buyer or brokerage asks questions. Use virtual staging selectively. A few credible room images are usually stronger than a full gallery of over-produced visuals.
Mistake 3: changing permanent property features
This is one of the highest-risk mistakes. Virtual staging should not quietly change:
- Flooring
- Wall color
- Cabinets
- Windows
- Doors
- Fixtures
- Landscaping
- Views
- Room layout
- Signs of damage or wear
Those are not simple staging choices. They affect what the buyer believes about the property condition. This matters for trust and compliance. Current MLS guidance often separates ordinary image enhancement from edits that change the actual property. If an AI-staged image changes permanent features, it may need stronger disclosure, the original photo may need to appear beside it, or the image may not be acceptable for your MLS at all.
For the compliance side of this workflow, use MLS rules and disclosure for virtual staging as the companion checklist.
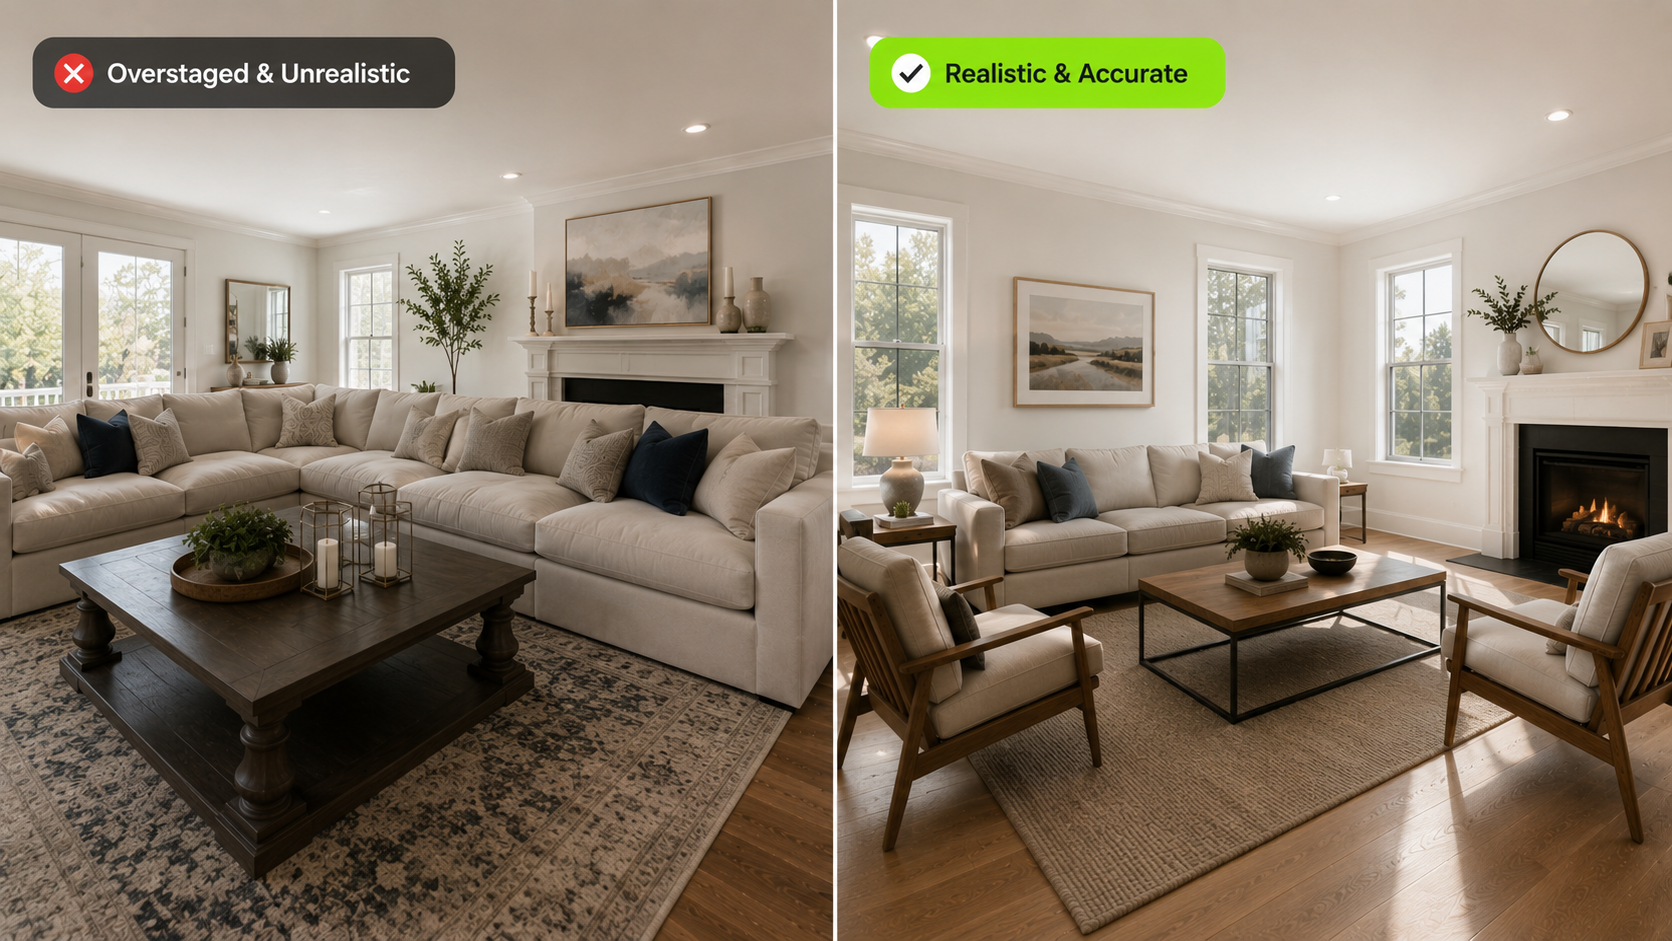
Mistake 4: getting furniture scale wrong
Scale problems make virtual staging look fake quickly. Common signs include:
- Sofas that feel too deep for the room
- Dining tables that block natural circulation
- Beds that make a bedroom look larger than it is
- Rugs that float without matching the furniture group
- Chairs that do not align with the floor perspective
The buyer may not consciously identify the scale issue, but they will feel that something is off. That feeling is enough to reduce trust. In DesignSense, review the staged image against the original room photo. Ask whether a buyer could reasonably walk into the room and imagine that furniture fitting. If the answer is no, reject that output and test another direction.
Mistake 5: choosing a style that fights the listing
Virtual staging should support the property, not impose a style that belongs somewhere else. A modest starter condo staged like a luxury penthouse can feel artificial. A premium listing staged with generic furniture can make the room feel cheaper than it is. A traditional home staged with an ultra-modern look may attract clicks but create a mismatch during showings. Use the listing context to guide style:
- Property type
- Likely buyer
- Price point
- Neighborhood expectations
- Architecture and finishes
- Seller or brokerage brand standards
The goal is not to make every room look trendy. The goal is to make the listing easier to understand and easier to believe.
Mistake 6: skipping disclosure
Turn one room photo into a clearer next step.
Upload a room photo, test one or two believable directions, and get to a publishable listing visual faster.
Virtual staging is a marketing tool, not a way to hide that an image was altered. Many MLSs require staged or digitally altered photos to be labeled. Some also require the original unaltered photo to appear near the staged version. State law can add another layer, especially where real estate advertising rules define digitally altered images broadly.
The practical rule is simple: if the photo no longer shows what a buyer will see when they walk into the property, treat it as altered media and label it. Disclosure is not only a legal or MLS issue. It is also a trust issue. Buyers are usually more comfortable with virtual staging when the label is clear and the image itself is realistic.
Mistake 7: publishing without human review
AI staging should not go straight from generation to MLS upload. Before publishing, review:
- Furniture scale
- Perspective
- Lighting consistency
- Reflections and shadows
- Window and door placement
- Whether the floor line still makes sense
- Whether the result changes the property's condition
- Whether the required disclosure has been added
This review does not need to be slow. A listing coordinator, agent, or brokerage marketing lead can usually spot the obvious issues quickly if they compare the staged image against the original.
DesignSense helps speed up the staging decision. Human review is what keeps the final image credible.
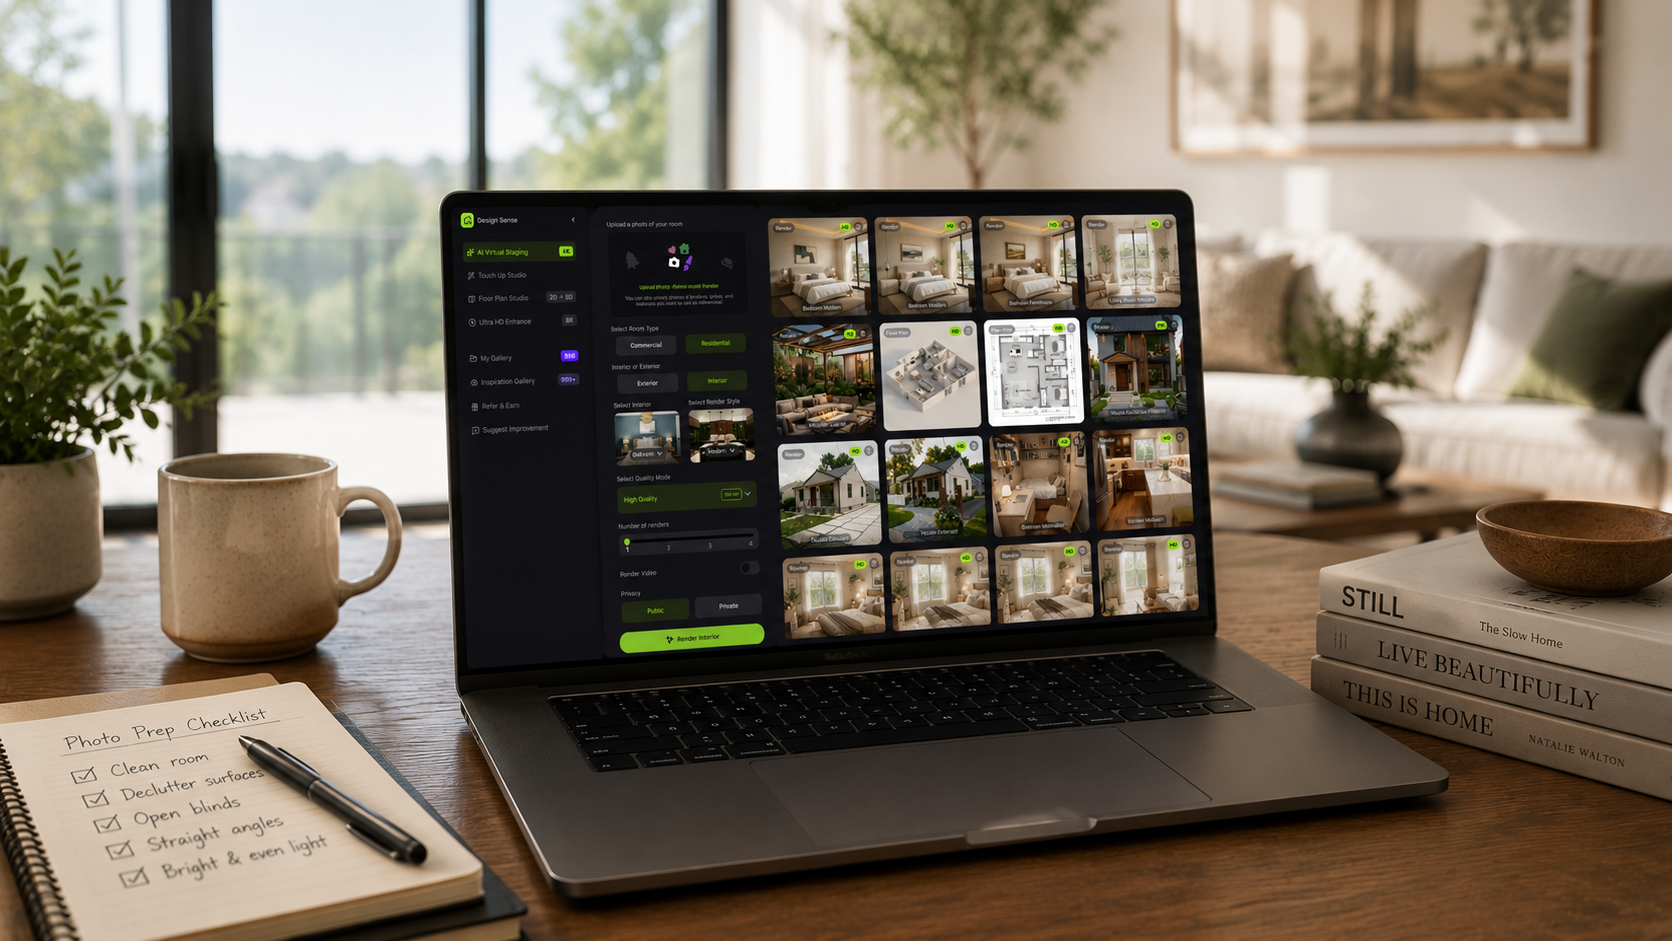
A cleaner DesignSense review workflow
Use this workflow before publishing AI-staged listing images:
- Select only the rooms where staging will improve buyer understanding.
- Upload the cleanest real room photo for each room.
- Generate a few realistic staging directions.
- Reject outputs that change permanent features or room scale.
- Choose the version that fits the listing price point and buyer expectation.
- Preserve the original unstaged photo.
- Add disclosure labels or original-photo sequencing based on your MLS rules.
- Upscale only the final approved image if it needs sharper listing quality.
This workflow keeps the tool useful without letting it outrun the listing team.
When virtual staging is not the fix
Some listing problems are not virtual staging problems. AI staging will not solve:
- Incorrect pricing
- Poor photography composition
- A weak listing description
- Deferred maintenance
- Confusing floor plans
- Buyer concerns about location
- A showing experience that does not match the online presentation
If the issue is that the room is vacant, dated, or hard to read online, virtual staging can help. If the issue is the property itself, staging should not be used as camouflage. For a broader decision framework, compare virtual staging vs traditional staging before choosing the production path.
FAQ
What is the biggest virtual staging mistake?
The biggest mistake is using virtual staging to make a room look materially different from the real property. Bad scale, changed finishes, hidden damage, and missing disclosure create more risk than value.
How many rooms should I virtually stage?
Start with three to five high-impact images. Most listings need the main rooms clarified, not every photo in the gallery staged.
Can virtual staging make a room look bigger?
It should not. A staged image can help buyers understand how furniture fits, but it should not make the room appear larger than it is. That creates trust and compliance risk.
Should I include the original photo?
Often yes, and sometimes it is required. Keep the original file even if your MLS does not require it in the public gallery. It helps with brokerage review, disclosure, and before-and-after comparison.
How do I know if an AI-staged image is realistic enough?
Compare it to the original photo. Check furniture scale, wall and floor lines, lighting, windows, doors, and room purpose. If the image creates an expectation the showing cannot match, revise or reject it.
Final recommendation
The best virtual staging is restrained. It makes a real room easier to understand without changing what the property is.
Use DesignSense to test credible staging directions from the actual room photo. Keep the output that clarifies the listing, reject anything that feels exaggerated, and handle disclosure before the image goes live. When you are ready to review a real room photo, test a staged room in DesignSense.
Turn one room photo into a clearer next step.
Use the free trial to turn one room photo into a staging direction that is easier to review, approve, and publish.